.png "Z-Wave example")
Z-Wave
Z-Wave is a wireless communications standard that can be used for automation of existing buildings.
Z-Wave
Z-Wave is a wireless communications standard that can be used for automation of existing buildings or adding additional features and functionality without the hassle with drilling holes and wiring.
Tutorial videos
Z-Wave Visualization / Z-Wave Server
Network Configuration
Main Z-Wave node displays an overview of the Z-wave network, where all the included devices and statuses are shown. All settings for the controller are also set in the main node.
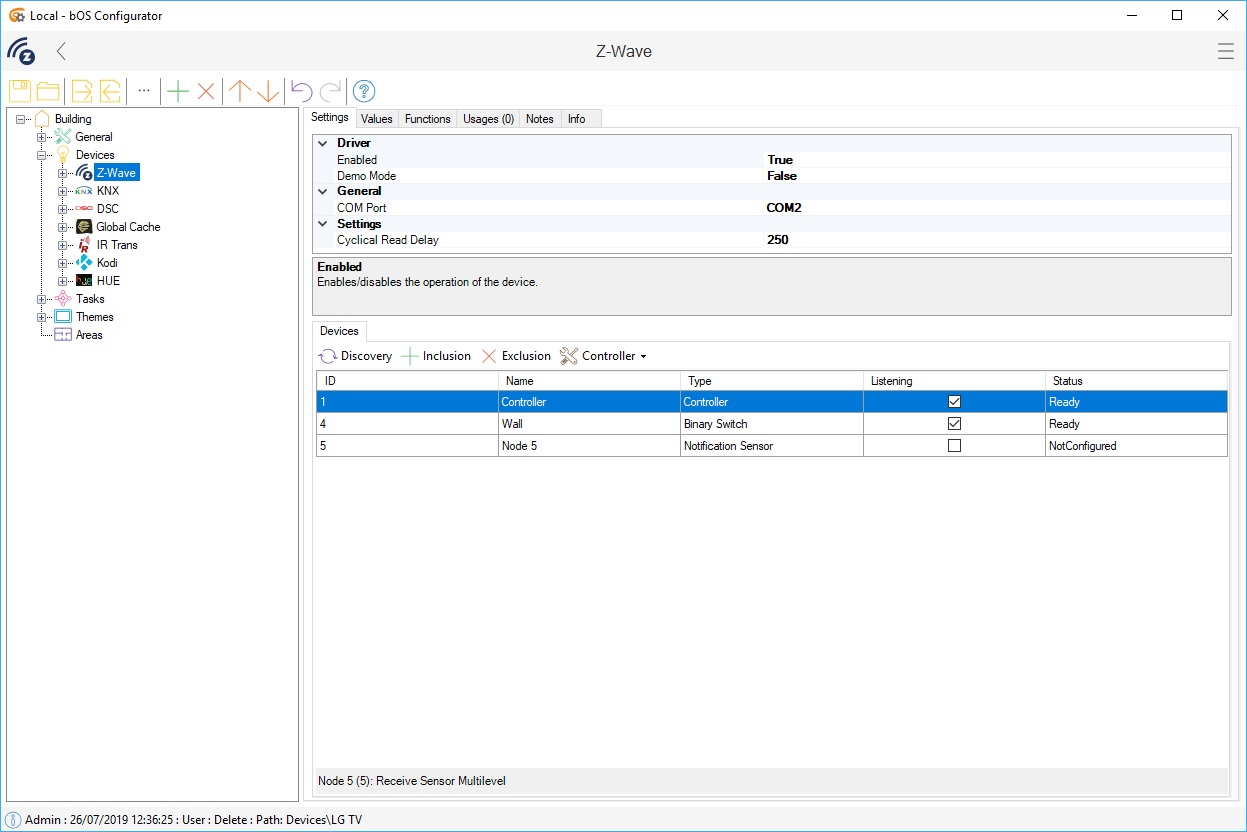
Picture 1: Z-wave node
Devices:
Discovery - Starts the discovery process, displays all devices that were included into the controller and adds devices to Z-Wave node.
Inclusion - Including a new device (device must be in inclusion mode).
Exclusion - Excluding an existing device (device must be in exclusion mode).
Controller:
Network Heal: Network heal is a tool that can rebuild the Z-Wave controller routing table of the entire Z-Wave network. It instructs every Z-Wave device in your Z-Wave network to find other Z-Wave devices in their direct range and report the results back to the controller.
Remove Failed Node - Removes broken Z-wave device from the list.
Soft Reset - Reboots the z-wave controller. Useful if the controller freezes. No data will be lost.
Controller change: function that allows transferring currently learned and included devices in the current z-wave controller to change/move to another controller. This can either be USB to USB or USB to Colibri.
Learn mode: When moving the devices from one controller to another, first controller (which has all the devices) is under Controller change mode and the controller we’re moving the devices to is under Learning Mode.
Reset to Default - Resets the Z-Wave controller to factory defaults. All included devices will be erased from the Z-Wave controller! NOTE: Reset to default only resets the Z-Wave controller if you want to include devices back or to another controller, you need to Exclude them first.
Selecting the device from the Devices list will provide additional information regarding the device, associations, connection to the controller, etc.
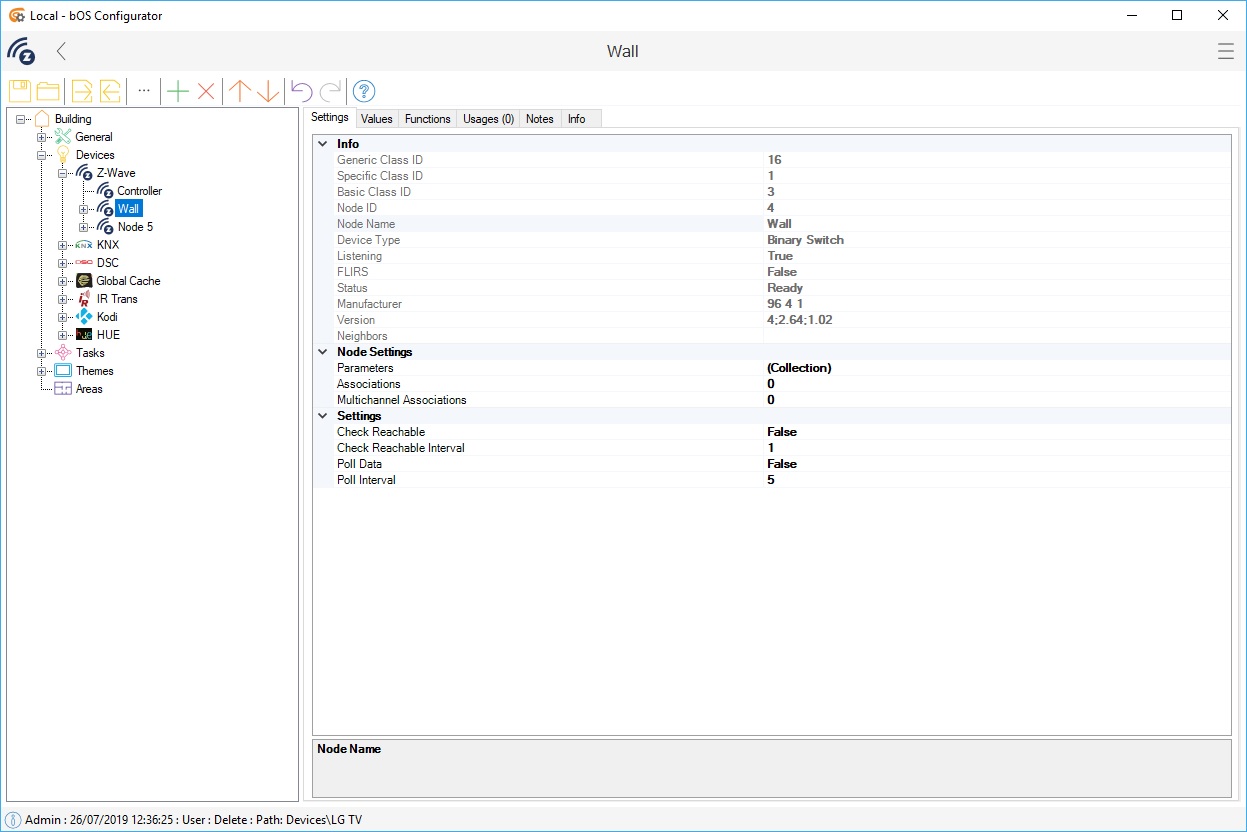
Picture 2: Z-wave device
Main Z-wave devices list:
ID - A unique ID that is assigned to a device when included to the network.
Node Name - Name of the device. If a device already exists in the configuration it will display the name from the configuration. If not, it will be assigned a default name which is a combination of DeviceType and Node ID(ex. BinarySwitch5)
Device Type - Type of the device.
Listening - Devices powered with a battery are set as not listening and devices powered any other way are set as listening.
Status - Current status of the device.
Possible statuses:Waiting- Waiting for device info.
Sleeping - A device that does not respond and is categorized as a sleeping device (device that is battery powered). Check the device documentation for how to wake up a device.
Unknown - Did not get any information about the device. It is probably unreachable.
Imported - Device with the same node id already exists in the configuration and will not be imported.
Incompatible - Device with the same node id already exists in the configuration but it is not the same type. It will not be imported.
Ready - Device is successfully discovered and ready to be used.
Parameters - Displays devices current parameters. All parameters can be tweaked to provide additional functionalities and communication settings between bOS or other devices. Not every device comes with a pre-made parameters list, some devices need manual parameters update.
Associations - Allows the device to be assigned into association groups. Association groups allow communication between different z-wave devices without the need of a Program task or additional programming.
Multichannel associations - Some newer Z-Wave devices have Multi-Channel integrated this means the device has multiple parts acting as different sub devices.
Wake up interval - Battery powered devices also have a Wake up interval set (in seconds) which wakes up the device each interval and send current status information to bOS.
Inclusion
Inclusion is a process of adding a new device to the Z-Wave network. The number of times an inclusion button on the device must be pressed varies from device to device. Please check the device documentation first.
Inclusion in bOS Configurator
Insert USB stick in the USB port (if the controller is our Colibri Z-Wave server, the controller should already be in the list).
Add a new Z-Wave node to the configuration.
On the right side in select correct COM port number and set Enabled to true.
Click Inclusion button in the Devices toolbar. This will start the inclusion procedure. Put the device in range of the Z-wave Controller. Then press the inclusion button on the device. In a few seconds device information should appear. After successful inclusion, associate the device with Z-Wave controller and set the device parameters.
Step 4 must be repeated for every device you wish to include.
Inclusion with USB stick
Not all USB sticks have this functionality. Example of a USB stick with an inclusion/exclusion button is the Aeotec Z-Stick Series 2.
The USB stick needs to be in close vicinity (less than 1m or 3ft.) of the device you wish to add. First press the inclusion button on the USB stick then press the button on the device. When you finish including all the devices follow the following steps:
Insert USB stick in USB port.
Add a new Z-Wave node to the configuration.
On the right side in Settings tab enter your COM port number and set Enabled to true.
Click Discovery button in the Devices toolbar. This should automatically start the discovery process. In a few seconds the list should be populated with devices you have added previously.
Exclusion
Exclusion is a process of removing a device from a Z-wave network. Not all USB sticks have this functionality. Example of a USB stick with an inclusion/exclusion button is the Aeotec Z-Stick Series 2.
Exclusion with USB stick
The exclusion depends on the device and the USB stick. Please check their documentation for details.
Exclusion in bOS Configurator
Select the main Z-Wave node.
Click on the Exclusion button in the Devices toolbar. This will start the exclusion process, then press the exclusion combination button on the device.
If a device was successfully excluded it should be removed from the bottom list.
Note: The number of times an inclusion button on the device must be pressed varies from device to device. Please check the device documentation first.
Device configuration
You can additionally configure a device by clicking on the device node and all additional information is displayed on the right. This form contains settings that are available for the device. For more details about a device please refer to the device manual or under the info node. Association settings are one of the most important settings for each device.
Association settings: This is a very important function of Z-Wave. It enables linking two devices (ex. PIR sensor and a light switch) to work independently from the USB stick. Assign a device (Node ID ) to an association group by clicking the Set button. To get devices assigned to the group click the Get button. You can also remove a device from a group by selecting it from the list and clicking Delete. For what a specific group does and how many they are please refer to the device documentation. Some battery powered devices must also be woken up in order to set the association groups.
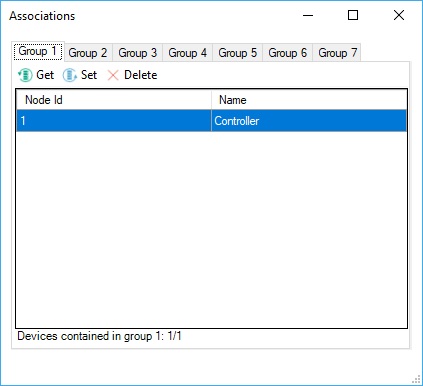
Picture 3: Association form
Parameter settings: Special settings for a device. For example; you can set an interval for measuring temperature in a thermostat. You can find parameter numbers, values and descriptions in the device documentation.
Not every device comes with pre-made parameters, some devices need manual parameters update.

Picture 4: Parameters form